
Internet Pinmap Instructions
The internet pinmap helps maintain the isolation areas
necessary to prevent cross pollination in seed crops.
It is designed to replace the paper pinmap in the Yuma extension office,
providing new features and improved record keeping.
The pinmap does not enforce isolation areas.
It only provides information and tools to assist you.
It is your responsibility to maintain seed separation.
This document contains instructions for how to use the pinmap to claim
and check isolation areas.
It begins by addressing some key points concerning the pinmap and then
provides detailed instructions for how to operate the internet pinmap
interface.
Key Points:
- The gateway to the Internet Pinmap is
http://minu.arec.arizona.edu/pinmap
- How an isolation claim is defined.
- Placing a pin stakes a claim for an isolation area centered around that pin.
- Pins have time/date stamps linked to them, as well as who pushed the pin.
- Multiple pins may be placed in an isolation area.
- The pin with the earliest timestamp has rights to the isolation area.
- Crops that do not cross pollinate can be placed
in the same isolation area without conflict.
- A pin status can be set to:
- Pushed. This is the status when the pin is first inserted.
It claims the isolation area for a
contract expected with a grower at that location.
The timestamp of this pinning is what determines who has rights to the isolation area.
- Signed.
This is an optional status designed to provide helpful information to others.
When the contract with the grower from the pushing stage is finalized,
a seed company can change the status of its pin to reflect the low likelihood
that the pin will be removed.
The timestamp of the initial pin pushing is retained to maintain the early
claim of the isolation.
- Removed.
At any time a pin in the pushed or signed status can be removed.
This irreversibly loses the claim to that isolation.
In order to maintain a record of all pinning activity,
a pin is actually disabled instead of removed.
Records of the pinning remain, the timestamp that the pin was removed is used
to replace the initial timestamp.
- A link to the complete history of all pinning operations is provided on
http://minu.arec.arizona.edu/pinmap
Training vs Operational Pinmaps
There are two internet pinmaps. It is important not to get
them confused.
- The Training/Demonstration Pinmap is for training and demonstrations.
The pins placed on this map do not claim isolations areas but are only for your practice.
Use this page to learn how to use the pinmap, or to test operations you are unsure of.
Entry is not password protected. Test accounts (and their passwords) are provided
when you visit the site.
- The Operational Pinmap is for actually claiming isolation areas.
It is password protected. You need to obtain your account and password
in order to have access to this map. Placing pins on this map is not allowed
until the pinning season is officially started.
Access to the pinmap.
The pinmap is password protected.
There are two levels of participant access to the pinmap: viewing and
pinning.
- The gateway password and login allows a participant
to enter the pinmap site. This password and login is shared by all participants.
- A unique seed company password and login allows a seed company
to enter a pin or change the status of a pin the seed company has already entered.
This password is used at when a pin is being placed,
after the seed company has already entered the pinmap site using the gateway
password.
-
The only user who can remove or change a pin is the user who placed the pin.
Using the Interface
When you visit
http://minu.arec.arizona.edu/pinmap
you will first see a gateway page with text and links to the training pin
map. Clicking on the link to the training pin map will bring you to the map itself.
For the training pinmap there is no gateway login or password.
At this point on the operational pinmap you will be asked
to provide the gateway login and password.
It may take few minutes to load the website the first time that you visit.
Subsequent visits will be much quicker.
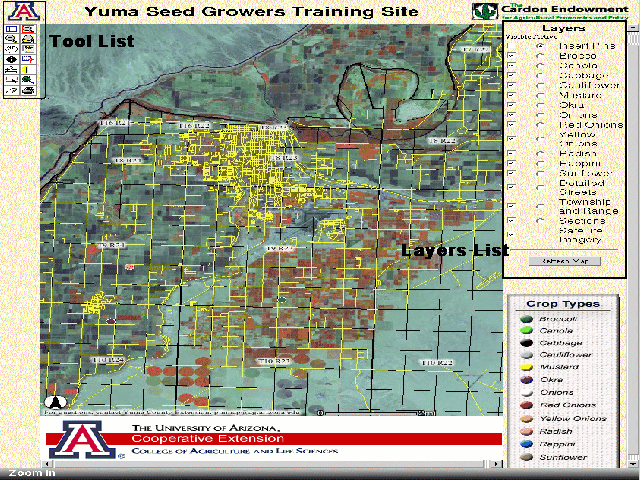
Login Screen

See the figure below for the main page layout you will see when you
first log in to the pin map. On the left side of the window you should see a set of
icons, or tools that you can choose from. In the center of the screen you should
see a satellite image of Yuma which will serve as the pin map. In the center of
each Township and Range, identification numbers are shown. On the right side of the screen
you should see a list of layers and the "Refresh Map" button. Below that
is a legend to the pin map that shows the pin color of each crop type.
You may need to scroll down to view the legend.
Main Page View
Tools You Will Need to Use
Use the mouse to click on the picture of the magnifying
glass with a + symbol inside of it to zoom in on the map.
Notice that new
information becomes available as you zoom in closer, such as sections and
detailed streets. Section numbers will appear in the center of each section
once you zoom in close enough. To zoom out, use the magnifying
glass tool with a minus symbol in the center.
The last magnifying glass can be used to zoom out to the complete view.
The hand tool can be used to pan the map.
Pin Information View

You can control which layers are visible (what layers are drawn
on the map) as well as choose which layer is active (to
be used for pinning, queries, or other operations).
Visible layers are chosen by clicking in the "visible"
box next to the layer name and then clicking on the refresh map button
located below the list of layers.
You may need to scroll down to see this button.
Clicking on the circle between the "visible layer box" and the
list of items will make that layer active.
Although many layers can be visible simultaneously,
only one layer can be active at a time.
Perhaps the most useful tool is the information tool or
red i with a circle around it  . If you select this tool and click on a feature
on the map (such as a pin), all information related to that point will
be displayed below the map. You may need to scroll down to see all of the
information. Other tools can be used for building queries, measuring distances,
and generating a printable version of the map you are viewing.
. If you select this tool and click on a feature
on the map (such as a pin), all information related to that point will
be displayed below the map. You may need to scroll down to see all of the
information. Other tools can be used for building queries, measuring distances,
and generating a printable version of the map you are viewing.
An additional web interface allows all of the pinning
history to be viewed. That interface can be reached through a link on
http://minu.arec.arizona.edu/pinmap
How to Claim an Isolation:
Selecting an Unclaimed Isolation:
-
The internet pinmap does not enforce where pins are placed.
Instead, it provides information about when a pin was placed and
who inserted it.
It is your responsibility to maintain seed separation.
-
We suggest that you
make any crops that could cross-pollinate visible
by clicking in the visible box next to each of them
and make other crops invisible so that they do not clutter the map.
Make sure to click on the refresh map button to redraw your new map
that only contains crops that could potentially conflict.
-
Use the pinmap viewing tools (discussed earlier) to locate and zoom
in on a location that is sufficiently far from pins representing crops
crops that could cross-pollinate.
The most useful operations are zoom, measure distance, and get information,
The query and buffer tools can be used to assist in the search for
a free isolation area.
-
Once you have identified a location where you would like to claim an isolation,
proceed to the next step, placing a pin.
Placing a Pin:
- For pin placement you must zoom in enough for the "Insert
Pins" layer to appear on the right side of the screen. This helps insure
accurate pin placement. Following the specifications of the paper pin map,
the 1/16 section grid is used. A pin placed anywhere a 1/16 section will
appear in the center of the 1/16 section. If multiple pins are placed in
the same 1/16 section, only one pin will be visible. The information tool
can be used to list everything within a single
1/16 section.
- The next step in pin placement is to make the Insert Pins
layer visible AND active.
Make sure to click on the "refresh map" button.
Next, click on the pin placement tool from the left side of the screen.
The picture of a pin and piece of paper is the tool used for inserting
or changing pins.
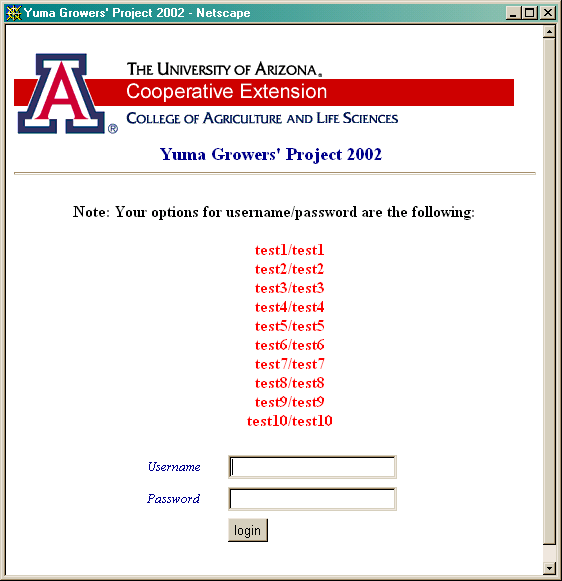
- A new window will appear requesting a username and password.
Note that this window may become hidden behind the pin map.
For the training version of the pin map, ten test usernames and passwords are listed.
Enter a username and password and then click on login.
Note that only seed companies will have usernames and passwords.
User Name and Password Window
- You will now see a dialog box with the login, seed company
name, Township, Range, Section, UTM Coordinates, and other information.
You need to select the grower and crop type from the two pull down menus.
This is why you need to supply us with a list of the growers you may be
working with.
Setting Up Your Pin Information
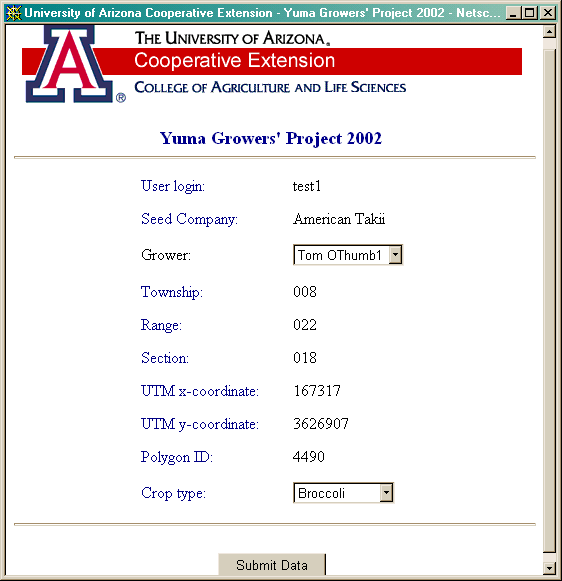
- Click on the submit data button on the bottom of the page.
Be patient, the webserver needs to communicate with a different computer
that holds the database. Because
of this communication between software, do not pay attention
to any hourglass that appears.
Instead, wait until the window changes to show the information that you entered.
Several seconds may be required.
At this point you can click on the return to map button at the bottom of
the window.
- Verify that your pin has been successfully placed.
To finish the pinning process, click on the Refresh Map button
on the right hand side of the screen (you may have to scroll down). The
map should be redrawn with the new pin on it. Although many people can
use the pin map at the same time, we own a limited number of
licenses for the software that allows pins to be placed in the map. If
too many people are placing pins at the same instant, your pin will not
be inserted. It is important that you verify that your pin has been
inserted into the map. If you do not see your pin, repeat the pinning
process. We are currently requesting for funding for additional software
licenses from the College of Agriculture.
- You have now placed a pin.
If you click on your recently inserted pin using the information
tool, you can see the information associated with your pin. All information
associated with the location you clicked on will be recovered, so you may
need to scroll down in order to see your pin information.
Two key attributes of the pin register the information necessary to establish
an isolation area.
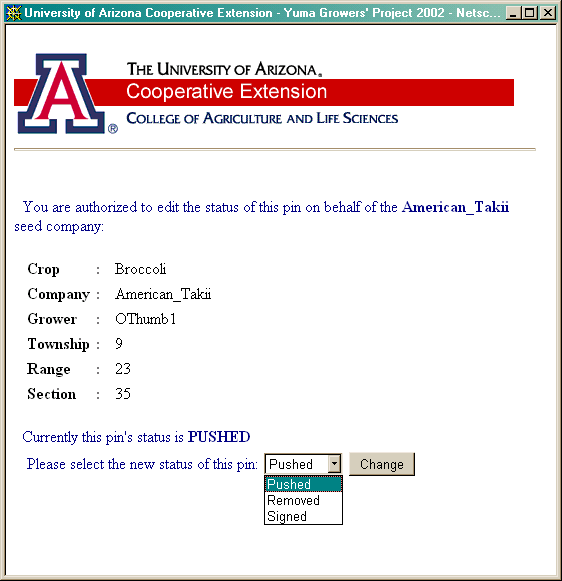
Changing a Pin
You can change the status of your pin to one of the following
three possibilities: Pushed, Signed, and Removed. To change the status
of a pin, you must be zoomed in enough so that the Insert Pins layer is
visible. You must make sure that the "visible" box next to the insert pins
layer has a check mark in it. If not, click on that box and then click
on Refresh Map. Click on the round circle next to the crop type of the
pin that you would like to edit, this will make that crop active. Recall
that you can scroll down in the window on the right to see the legend for
colors associated with each crop type. Next, go to the left side of the
window and click on the pinning tool this will now allow you to use the
mouse to click on your pin.
You will see the username and password window (see above example). It is
important to note that you can only change pins if you have the username and password
of the seed company that placed the pin. Type in your username and password, then click on
the OK button. You will then see information about the pin.
The timestamp is the key information for resolving who
has rights to an isolation area. If you change a pin from pushed to signed,
you retain the original timestamp from when the pin was initially pushed.
If you remove the pin, it is no longer visible on the map but continues
to exist in the database. The original timestamp is lost when a pin is
removed. There is a pull down list to change the status of the pin. Select
the status you would like to change the pin to and then click on the Change
button. The window will show the pin change action you just did. You can
now click on the return to map button to return to the pin map.
Changing the Status of Your Pin
It may be helpful to quit out of our web browser completely
and revisit the pin map if things get too confusing.
Remember that dialog
windows may become hidden behind the map graphics window. If you have additional
problems with the pin map, please let us know so that we can improve the
software and documentation.
Advanced Features
The pinmap has additional tools to assist in determining an isolation area.
Layers can be buffered and queried. You are encouraged to experiment with
these tools. Because of the complexity of their use,
they are not covered in this documentation.
Because it is easy to run a mis-specified query or buffer, we suggest
you use them as aids only and do not rely on them when determining if
an isolation area is available.
Overview Map
-
The overview map appears in the upper left corner of the screen. The area you
are zoomed to is marked in red on this map.
-
You can zoom to a location using the overview map and zoom tool.
-
When viewing the pinmap,
click on the tool that looks like this:
 to turn the overview map on or off.
How to Zoom to Township, Range, and Section
- You must be zoomed in enough so that the Sections layer is visible on
the right hand side of the screen. If not zoom in with the magnifying glass
icon. It does not matter where you zoom in.
- Click on the circle next to the Sections layer to make it Active.
- Click on the picture of the binoculars (the Find tool) on the left side of the screen.
- The Find dialog will appear at the bottom of the screen. There is a box that you
can type text in. If the text box is not available, use the scroll bars to move it
into view.
- Type the township, range, and section in this format: T8R18S5
- Substitute the legals of the section you are looking for.
Do not use spaces and make sure that T, R, and S are capitalized.
- Click on the Find String button or press enter.
- The server will search for the section.
- Once the server is done, you will see the section listed at the bottom
of the screen.
- Click on the blue underlined one and you will zoom to the section.
- The section will be highlighted. If you want to make the section unhighlighted,
click on the picture of the eraser on the left hand part of the screen.